Gluten-free Pumpkin Waffles

I started writing this blog to record my attempts with all things Pinteresting. I’m so glad you’ve stumbled on it!

This morning I found a recipe for gluten-free pumpkin pancakes: http://www.houseofbrinson.com/home/2013/4/18/a-confession-pancakes.html#.UmPxNpm9LCR

I decided to alter it a bit, using coconut oil instead of vegetable oil, pumpkin pie spice instead of the individual spices, and milk instead of almond milk. I added almost a half cup more milk than the recipe requested, and it was still too thick for pancake batter… So I made waffles!

20131020-095332.jpg

Microwaved Scrambled Eggs

A few friends have asked me recently how I make scrambled eggs in the microwave. I’m always happy to share.

First, you will need a glass bowl, eggs, a fork, and a paper towel or napkin.

I used a 1 quart bowl for two eggs here, but recommend a larger bowl if you’re making more than two eggs. Also, it’s important to note that microwave cooking times vary – my microwave cooks slower than my in-laws – so you will be able to adjust your cooking times with a little practice.

20130407-091842.jpg

20130407-091856.jpg

20130407-091906.jpg

Crack your eggs into the glass bowl, then using a fork, scramble the yokes and whites. Lay your fork on a paper towel as you will need it again, and again.

For two eggs, I cook one minute then stir, then cook thirty seconds longer. I recommend you start with 30 second increments, because over-cooked eggs have a strange weblike texture that isn’t appetizing.

20130407-092308.jpg

20130407-092317.jpg

When the eggs are cooked to your liking (I like mine mostly dry), stir once again and plate your meal.

20130407-092428.jpg

My 300 calorie Paleo breakfast shown above was “made in the microwave” – reheated cinnamon yams, green beans, and scrambled eggs. Now that is breakfast reinvented!

Paleo Starbucks Hack

Since “going Paleo” and quitting my six-a-day soda habit, I’ve found I do still need a caffeine boost once in a while. I’m no coffee drinker, but I can enjoy a Starbucks Caramel Macchiato as much as the next girl – that is I could if I was Paleo-Cheating.

I started researching how I might Paleo-hack a macchiato. My preferred milk substitute is Almond milk, so I needed a frother that could handle that – This frother at Williams-Sonoma had the best reviews, so I acquired one Friday night.

20130401-203553.jpg

I heated the almond milk for two minutes in the microwave before pouring into the frother. (I’m one of those wimpy 140 degree drinkers – so I didn’t want my frothy almond milk to burn my delicate mouth.)

20130401-204805.jpg

Next I frothed, using the frother according to the directions, resulting in a lovely froth. Frothy frothness.

20130401-203856.jpg

In the mean time I brewed up a tiny but strong cup of coffee.

And then the two were joined in frothy matrimony, creating an Almond Milk Caffe Misto that I topped with cinnamon.

20130401-204155.jpg

As far as I can judge, it’s a perfectly acceptable Paleo substitute for Starbucks. But, I’m still not a big girl, eh coffee drinker, and it was a bit too much like real coffee for me to enjoy.

My husband insists I need a lighter roast, I think I need less coffee no matter how light the roast. Either that or I need to whip up a Paleo Caramel Sauce to sweeten this up! The linked recipe uses honey and maple syrup – which are not strict Paleo, but are my two favorite natural sweeteners.

Advice welcomed!

Gluten-free Waffles

20130317-201421.jpg

My dear, sweet husband knows how much I love waffles. And in his sweetness he did something I would not have done… He spent $18.95 on waffle mix.

You see, with my gluten sensitivity, I’ve cut many of my favorite breakfast items out of my life for the sake of feeling better. Pancakes, waffles, coffee cake, toast- all gone.

So, back to the most expensive waffles I’ve ever made. The Ad Hoc brand mix is available over at Williams Sonoma along with several other gluten-free mixes. The ingredient list includes several other flours (rice, tapioca, potato) and sugar, so it’s certainly not Paleo, but I’ll take gluten-free when I can find it!! The recipe calls for milk, butter and eggs added to the mix.

20130317-202326.jpg

The batter is almost like a quick-bread dough, quite a bit different than traditional waffle batter. I used my preferred waffle iron settings as usual, and found that was just right.

The waffle’s texture was very similar to a “regular” waffle. The flavor was superb- although a dash of cinnamon or a bit of orange zest would be a nice addition. I topped mine with pure maple syrup.

20130317-203025.jpg

The batter made five waffles, the one I ate plus 4 more in the freezer that I’ll toast up on treat days. As a plus, the box contains 2 packages of mix, so really it wasn’t too outrageously priced ($1.90 a waffle is still cheaper than eating out).

Cutie Buns

20121231-115245.jpg

My best friend is a culinary mastress. She whips up loveliness with the greatest of ease. Breakfast is no exception. When our families come together each New Years week, she puts together such delightful meals that we often wish we had paid more attention in her kitchen. She is kindly sharing her sticky buns recipe today!

Here is what you need:
Bridgeford pre-cut rolls- 2 packs of rolls used here (found in the freezer section, thaw in refrigerator overnight)
One stick of butter
Zest of 2-3 Cuties (Clementine oranges)
A cup or so of Granulated or Super-fine Sugar (to fill a shallow bowl)
2 Bundt pans
Citrus Zester
Two bowls

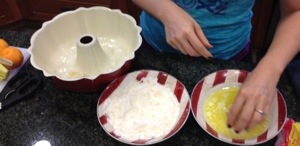
Start with a stick of butter in one of the bowls, and the sugar in the other bowl.
Begin by zesting the Cuties, allowing all of the zest to fall into the bowl of sugar.
The zest is rich in essential oils that when blended with sugar begins to leach out creating a slightly crumbly, orange oil flavored sugar. You will gently crush the zest into the sugar to achieve this. (You can even do this the night before.)

20121231-120851.jpg

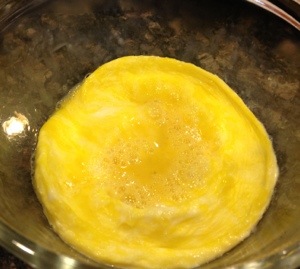
Next, melt your butter completely.
Squish a thawed bun a bit, roll it in butter, then roll in the zest-sugar. Place the coated bun into the Bundt pan, and repeat this process using one bag of buns for each Bundt pan.

20121231-123919.jpg

Allow 1-2 hours for the buns to rise in the Bundt pan, until they have doubled in size. Then preheat your oven to 350F (175C). Bake for 15-20 minutes, watching to be sure they don’t over-brown. Some folks prefer under-done, super-sticky buns, so this is where your judgment comes in.

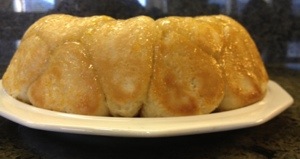
When you pull the Bundt pans out of the oven, immediately cover with a plate and flip the Bundt pan over so the buns rest on the plate. Allow gravity to pull the buns out of the pan, while the oozing, sugary goodness works its magic.

As soon as the buns have dropped onto the plate, lift off the Bundt pan and allow your family and friends to pull apart their desired portions to be consumed with delight!